Introduction
If you have conversions happening inside of a platform that does not have native webforms, and does not have the ability to send webhooks, and is not already integrated with Zapier, but does have the ability to send an email each time an event occurs, you're in luck! In this article, we'll show you how to use Parsey to parse emails and then send the lead/appointment/sale information on to Evidence to be displayed on your website in the form of social proof.
Step One: Evidence
The first thing that you will need to do is create a new Source within Evidence. To stay organized, we recommend you preface the name of each source with the name of the service that is sending the information. Since I'm using Parsey, I'll name my Source "Parsey - New Orders"

Click the Add a Source Button.

Name your Source.

Now select "Webhook Received" and click CREATE.

Click Copy to copy the webhook end-point URL. You'll need this later on.

Step 2: Parse Emails
Parsey is an Email Parsing service. It extracts information out of emails, and allows you to send that information elsewhere. You can sign up for a FREE account here.
Once you've signed up, log into your Parsey account and head to Email Flows.

Once there, click on the Create Mailbox button.

Label your Mailbox something that makes sense to you, and click Save Mailbox.

Your Parsey mailbox has automatically generated an email address. This is the email address that you will have your order/lead/appointment emails sent to. Click the Copy button to copy the email address and set up the forwarding.

Until Parsey receives an email, the Email Flow will have a yellow line to the left.

Once Parsey receives an email, the yellow line will turn blue, indicating that you can now configure the Email Flow.

Click on the Gear icon of the Email Flow, and select "Edit Parser Fields".

Now you can configure the fields to be pulled out of the email (this is the Parse Emails part). I'll start with the customer's first name. Click on Add Field.

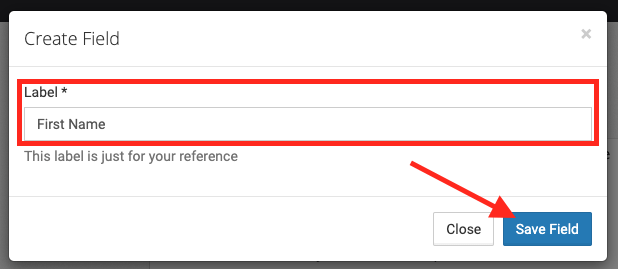
Give the field a label and click Save.

With your cursor, highlight the First Name, and click the Yes that pops up to confirm the value.

If the highlighted value is correct, click Confirm.

Repeat this step until you have created all of the fields that you want to send to Evidence.

Now click the Configure Actions button.

Select the SEND A WEBHOOK option.

Paste the Webhook URL that you copied from within Evidence.

In the box, type in a label for the first field you will send to Evidence.

Then click the "i" icon to access your merge fields. Copy the merge field for the corresponding field.

Paste the merge field in the box next to the one you have already filled out.

Click the "+" button to the right, and repeat these steps for your other fields.

Click Save Webhook once you have configured all of your webhook fields.

Click the Back to Actions button.

Turn your Send a Webhook action from OFF to ON.

Click Email Flows.

Turn the Email Flow that we just created from OFF to ON.

Now we need to have Parsey send Evidence a webhook so that we can create fields in Evidence. The quickest way to do this is to reprocess the email that we already have in the Parsey Mailbox. This will make it so that Parsey sees the email as brand new and works its magic to send a webhook to Evidence. Click the mailbox icon next to the mailbox.

Click the checkbox next to the email that you want to reprocess, and click the "Process Selected Emails" button.

Click "Yes" on the confirmation window that pops up.

Now head back over to Evidence and open up your Source.
Step 3: Evidence (Again!)
By now Evidence should have received the webhook from Parsey. There should be a visible drop-down box that says "Add a field".

Select the FirstName field from the drop-down box and set it as the First Name in Evidence.


Repeat those steps for the rest of your fields. (Make sure you do one for the Email Address as well!)

Now turn on your source and click PUBLISH.


Step 4: Adding your source to a Notification
Under the Sources tab of your Notification, click CONNECT A SOURCE.

Under the Source Settings, click the Use Existing radio button.

Select your new source from the drop-down and click CREATE.

Congratulations! You're all done!
Relevant Articles to Parse Emails using Parsey
- Integrate with Evidence.io (Documentation for Developers)
- How to Configure a Conversion Notification
- How to Configure a Streak Notification
Create Your Free Evidence Account
Increasing your website's conversions isn't always black and white. With so many ways, it can be confusing where to start. Evidence makes this easy. Within a few minutes, you can have real-time social proof added your site and boosting conversions from 10-15%.
Social proof is the best way to build trust and increase buyer urgency. With a free trial to Evidence, you can adding add high-converting notifications to your website. Your free trial includes:
- Unlimited Domains
- Unlimited Notifications
- Conversion Notifications
- Hot Streak Notifications
- Visitor Count Notifications
- Offer Notifications
- Announcement Notifications
- Boomerang Tabs
- Powerful Design Editor
- Best-in Class Display Options
There is no long-term obligation. If you don't see results, simply cancel. Visit Evidence.io and create your trial account today.
If you ever need help sending data to Evidence, check out Parsey.com.